Tuesday 22 December 2015

A 14th century annular brooch


This is just a tiny project, but it's cute.  Yes, that is a full-size brooch.  These medieval annular brooches were generally very small.


Brooches like this have been found in London and York, and could be made in a variety of different metals; this one is brass and is based on a 14th century brooch from London.  The design is growing on me.  When I first saw it I thought it looked interesting, but the more I look at it, the more I like it.  It reminds me of a little wreath.


The Challenge: Re-do.  This is a re-run of both Challenge 3: Stashbusting, and Challenge 7: Accessorize.

Fabric: N/A.

Pattern: This tutorial, brought to my attention by Cathy Raymond.  Thanks Cathy!

Year: 1350 to 1400 CE.

Notions: Brass wire, pliers, a whetstone to sharpen the pin.

How historically accurate is it?  A good 90%, I think.  It's constructed like the medieval originals and there is a brooch like this from London which is made of brass.  I suspect the exact composition of my wire is different from medieval brass, but that's just being pedantic.

Hours to complete: Less than one.

First worn:  Not yet, I've only just finished it.

Total cost:  That brass wire has been sitting in my drawer for years and the brooch only used a small quantity, so probably less than a dollar.

Sunday 13 December 2015

Minoan/Mycenaean helmet pattern

My proposed reconstruction of the Phaistos helmet has two layers of leather: an inner layer that creates the distinctive conical shape, and an outer layer of horizontal bands that will be sewn together.  I'm putting the pattern on the net here in case anyone wants to use it.

This pattern is for the internal layer of the helmet; I'll talk about the outer layer in a future post, but today we're going to concentrate on the helmet's internal construction.  While the exterior design of bronze age Aegean helmets varied considerably, the internal construction seems not to have changed very much.  My helmet is based on a  Minoan relief from the 16th century BCE, but this pattern would work equally well for many of the late Mycenaean designs or for the classic boar's tusk model.  Enjoy!

The neck and cheek guards are of course optional; many bronze age helmets didn't have them.

This pattern makes a helmet whose circumference is 600 mm (24").  It needs to be slightly too big for your head because it will have a felt cap (πιλος) inside it.  If you use this pattern you'll have to check that the dimensions work for your head, but to some extent it's a one-size-fits-most deal.  If it's a bit loose all you have to do is add another layer of felt inside it. Linear B inventories of armour from Knossos and Pylos include helmets, which makes me wonder if they were sometimes mass produced.


The pattern piece is sewn together at the center front with linen thread and the top has been cut into strips, which are tied together in a bundle to give it the conical beehive shape.  This process is more difficult than you might think.  Expect to spend a lot of time fiddling with the top knot to make it work.

If you use very thick leather you'll find, as I did, that it's impossible to tie all the strips together at the top.  I tied only some of my strips into the top knot, and left the others free on the inside of the helmet.  I don't think this affects the protective qualities of the helmet, especially since this is only the internal layer, but it's interesting because when Homer describes Odysseus' helmet he says the leather strips at the top are "interwoven".  I wonder if this is what he meant?


My helmet is made of 5 mm thick veg-tanned armour leather.  Here in NZ it can be bought from Lapco and as far as leather goes it is not too expensive.  Ideally you do want this kind of leather, but if you can't get it or can't afford it you may be able to use an old leather jacket. Part of the reason you need thick, stiff leather is that the top part of the helmet has to keep its shape on its own without any other support.  It is literally strips of leather tied together.

You may be wondering why the seam is at the front instead of the back, which is the more intuitively obvious place.  That's because this helmet has a neck guard at the back.  Putting the seam up the center back would screw up the neck guard, and the seam will be covered by another layer of leather, plus metal reinforcing discs, so it should be safe enough.

Monday 30 November 2015

Some thoughts on the beehive helmet

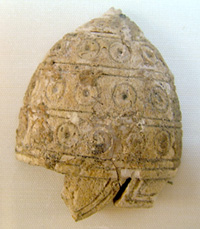
I want to make a beehive helmet, like the one shown in this ivory relief from Phaistos.  It's basically the same thing as the famous boars' tusk helmet featured in the Iliad,  but with what appear to be metal studs instead of tusks.  Metal studs may have been a cheaper alternative and were a popular choice right up until the end of the Bronze Age.

Picture from the Salimbeti website

Various forms of beehive helmet are depicted in Greek art from the Neolithic through to the end of the Bronze Age, but they all have that distinctive conical shape and in most cases seem to have been made from leather or linen, although metal versions did exist (and in some cases they continued to be used in the Classical period).

I'm reluctant to compare the beehive helmet to a modern military helmet, because it was designed for a different purpose.  The beehive helmet didn't have to stop bullets, because in 1600 BCE bullets didn't exist yet.  It had to protect the wearer from arrows and sword blows, as well as maces and stones fired from slingshots.  Slingshots were not uncommon on ancient battlefields in Europe and the Near East because they were cheap, and they could be very effective too.

This meant the beehive helmet had to be resistant to cutting or piercing, and it also had to protect the wearer from blunt force trauma.  It would have been very important to use designs and materials that could absorb and dissipate the kinetic energy from an impact.  In this respect I think the beehive helmet would have worked rather like a motorcycle helmet.

Let's take a look at a motorcycle helmet:

Image found here.
The helmet has a hard outer shell which may be made from thermoplastic, kevlar, or carbon fiber.  Inside the shell, there is a thick layer of styrofoam, which dissipates the energy of an impact.  This is the part that prevents head injury.  Next comes a layer of soft foam to help the helmet sit comfortably on the rider's head.  These days some military helmets also have foam inside them to absorb impacts.

Homer gives us a little bit of information on how boars’ tusk helmets were made, and I think this information can be used as a starting point for reconstructing the Phaistos helmet.  In book 10 of the Iliad Homer describes the boar’s tusk helmet which Meriones gave to Odysseus:

"On the inside there was a strong lining on interwoven straps, onto which a felt cap had been sewn in. The outside was cleverly adorned all around with rows of white tusks from a shiny-toothed boar, the tusks running in alternate directions in each row."

This is a cross section of the helmet Homer described:

Picture from http://www.salimbeti.com/micenei/helmets2.htm

In terms of function, this is quite similar to the motorcycle helmet.  The boars' tusks correspond to the hard outer shell of the motorcycle helmet, while the leather core would absorb impacts.  The felt lining made it more comfortable to wear.  Boars' tusk helmets, by the way, weren't exclusive to Greece.  They've been found as far afield as Serbia.

The ivory helmet from Phaistos dates to the 16th century BCE and is therefore roughly contemporaneous with many depictions of boars' tusk helmets, so it seems feasible that it would be constructed in more or less the same way.  I'm going to explore that hypothesis, and try to reconstruct the Phaistos helmet using leather.


Tuesday 24 November 2015

A small project for November

This month's HSM challenge is Silver Screen - make something inspired by a costume from a movie or TV show.  My original plan for this challenge was to make an Egyptian bead dress (a historicized version of a costume Theda Bara wore in Cleopatra), but in order to get that done in time for the deadline I would have to have started sometime around July.  I didn't.  So I've had to scale back my ambitions and find a less time-consuming project.

The idea of taking something blatantly, egregiously unhistorical and turning it into something actually attested in the archaeological record really appeals to me, and that was always what I wanted to do for this challenge, but as I say I ran out of time.  Then one day I was flicking through my copy of The Viking Way while I waited for some code to compile, and I came across the Hedeby masks.  And I remembered that episode of Vikings, where the French emperor Charles and his daughter Gisla have those outstandingly unhistorical masks.

Vikings gets a lot of flak generally for its historical inaccuracy, and for good reasons.  I understand the process and the considerations involved, but I find Vikings hard to watch because it departs so far from reality.  As far as those masks go I'm not aware of any historical reality behind them and I have no idea why the writers chose to give the characters masks*, but the vikings did have masks and I thought a historically accurate viking era mask would be a fun little thing to make.  As always with Vikings, the reality is much more interesting, and much stranger, than the TV show.  In reality, viking masks looked more like this:


Reconstruction of a 10th century viking mask made from felt.


This mask is based on a 10th century one from Hedeby.  The original appears to represent a sheep and I tried to make mine look like a sheep too, but I should probably point out here that we do not know for sure the Hedeby mask was meant to be a sheep.  It's a bit ragged now and may have been bent a bit out of shape, but it certainly looks like a sheep.  Here is the original Hedeby mask:


From page 172 of The Viking Way by Neil Price.

The masks found at Hedeby were probably used in rituals relating to the god Odin.  It's a standing joke in archaeological circles that any object whose purpose isn't immediately apparent must be a ritual artifact, but in this case we can be reasonably confident the masks were associated with worship of Odin.  There's a good discussion of this in The Viking Way, and we actually have a 10th century description from Constantine VII of a dance that involved animal skins and masks.

The original Hedeby mask has a fuzzy nap, made by brushing the surface of the felt with some kind of a stiff brush.  My version also has a nap made by brushing the felt surface in the direction the sheep's fur should go.


The Challenge: Silver Screen.

Fabric: A piece of felt 25 cm by 25 cm, which I made from the wool I had left over from my Borum Eshøj belt.  It's easy enough to make felt from yarn if the yarn is thick and made from real wool; you simply un-spin the yarn and felt the resulting strips of un-spun fiber.

Pattern: The Viking Answer Lady provides a gridded diagram of the Hedeby sheep mask.  I played around with it to make a pattern that takes into account the shape of the surviving fabric and is bilaterally symmetrical, as the mask would have been originally.

Year: Somewhere around the 10th century.

Notions: Linen thread to sew up the nose and help shape the head.

How historically accurate is it?  I think it's very accurate.  Maybe even 90% as the pattern is directly based on a 10th century artifact.  The felt I made is wool, but it may not be exactly like wool used in the viking age.  I'm not sure about that.

I made the felt with soap and a sushi mat, which of course isn't the authentic viking way.  I don't know how they made felt, but I do know how cloth was fulled in the middle ages and I therefore suspect the felting process involved urine.  There's a limit to how far I'm prepared to go in the pursuit of historical accuracy.

Hours to complete: Two, including making the felt and messing around with the pattern.

First worn:  I tried to take some photos of me wearing the mask, but this was not a success as it turns out the eye holes on the original aren't quite in the right place for me to see out of them.

Total cost:  Effectively $0 since the wool was left over from a previous project.  This piece of felt would have used a couple of dollars' worth at most.


*If this was Fargo or perhaps Game of Thrones I would be inclined to think the masks had a symbolic significance, but Vikings is not that clever.

Thursday 19 November 2015

Brocaded tablet weaving pattern

Here are the patterns for the strip of brocaded tablet weaving I made recently.  Feel free to use them however you like.  Note that these are brocade patterns; they don't have anything to do with the way the tablets are threaded and could be used for any type of brocade.  My ground weave was just a plain four-hole structure with all the holes threaded in the same colour, which is how the original from Birka was made.

This interlace design is copied from band 2 from Birka grave 824.


The numbers refer to tablets.  By way of a recap, here's what the pattern looks like made up:


This is the pattern for the rune design:


As before, the numbers along the top indicate tablets, but this is a brocade pattern.  It doesn't show how tablets should be threaded.  Each row corresponds to a shed - i.e. a quarter turn of the tablets.

Tuesday 17 November 2015

Farmhouse ale

Saturday was brew day at my house.  I made some farmhouse ale like great-times-many grandma used to make.  Farmhouse ale is also known as raw ale, and the defining characteristic is that it's made without boiling the wort.  This is how most beer was made up until recently, because in the past people didn't have access to metal containers large enough to boil their wort.

My first ever batch of farmhouse ale

As an aside, you may have noticed there's no airlock on that container.  When I made mead I found I didn't really need one.  The container's cap is screwed in place loosely, which allows the carbon dioxide to escape and prevents contaminants from getting in.  That's what an airlock does, plus it lets the brewer see whether fermentation is taking place.  I know whether fermentation is taking place because I can hear it bubbling when I put my ear next to the cap.

Anyway, back to the ale.  I discovered the concept of raw ale when I found Lars Marius' excellent blog, and decided I would like to try some.  Apparently it is very different to beer made with boiled wort, but in a good way.  This seems to be because the protein from the barley, which is normally destroyed by boiling, remains in the beer.  Farmhouse ale, therefore, is a source of protein and more nutritious than your typical modern ale.  The downside is that leaving the protein in the beer reduces its shelf life, but if it tastes good this will not be a problem.

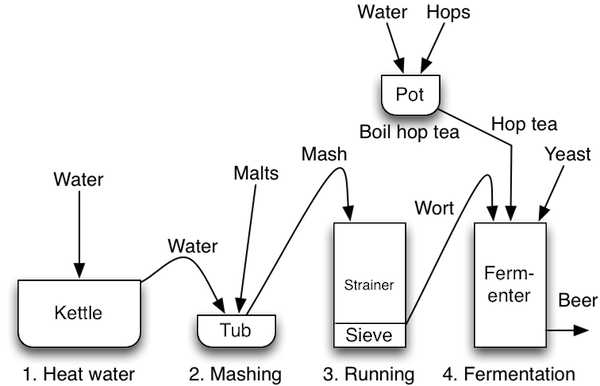
The process for making farmhouse ale is a fairly simple one, as summarized in the following diagram:


Diagram from Larsblog

I used a simple infusion mash - I just added hot water to crushed grain, and left it for 90 minutes with towels wrapped around the pot to keep the temperature stable (thanks to Chris Colby at Brew Your Own for that helpful suggestion).  My hops were boiled for 60 minutes.

The amount of grain per liter of recipe yield seems to vary a lot, but based on things I've read online I've assumed between 0.25 to 0.6 kilos of grain per liter of beer.   I've got about 9 liters of beer using 3 kilos of grain.  Here are the ingredients I used:

  • 3 kilos of mild ale malt
  • Half a pack of Styrian Goldings hop pellets
  • Half a pack of Mangrove Jack brand Belgian ale yeast
  • A pinch of coriander seeds.  I like coriander in my beer.


Things I have learned so far:

  • Brewers' World in Lower Hutt is awesome.
  • I need a bigger mashing receptacle.  Anyone got a chilly bin or boil-up pot they don't want anymore?
  • According to some of the posts on Larsblog raw ale can be an acquired taste, and I can believe that.  It looks like the ale will be quite thick and have a lot of body to it, which doesn't really surprise me given its protein content, and if you normally drink commercially produced lagers this stuff probably would be very different from what you're used to. 
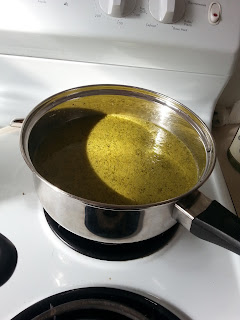
  • Hop pellets totally look like a pot of boiling pond scum when they are being cooked.


See what I mean?

But will my ale be any good?  I have no idea and will just have to wait and see.  What I do know is that at $15.80 for 9 liters, if this is even vaguely drinkable it will be good value for money.  It's just about finished its primary fermentation now, and so far its colour and smell are not unlike Funk Estate's Berliner Weisse.  Hopefully that's an indication of the flavour.

Sunday 1 November 2015

My October project

I've been looking forward to October's HSM challenge, but October hasn't been a good month for me and I've only just got the project completed.  October's challenge is Sewing Secrets:

"Hide something in your sewing, whether it is an almost invisible mend, a secret pocket, a false fastening or front, or a concealed message (such as a political or moral allegiance)."


The brocaded tablet woven bands from Birka were between 6 and 15 mm wide, my version is about 13 mm.

This is an adaptation of a brocaded tablet woven band from Birka.  What are its secrets?  For starters green and gold are the colours of my alma mater, Victoria University of Wellington.  The pattern also includes a runic cipher, a kind of magic inscription meant to bring good luck.  For this challenge, I wanted to explore the concepts of runic codes, and magic in viking age textiles.  In the viking world there was a strong association between textiles and magic, and their literature contains plenty of references to textiles with magical properties.

This diagram shows the rune symbol I used and how it works.  It combines the letters G and A, which are the initials for gibu áuja, or "good luck" in Old Norse.  I wove the runes in groups of four in a decorative pattern.


I chose this symbol mostly because it's very easy to work it into the kind of pattern we see a lot in Norse tablet weaving.  Norse tablet weaving designs used geometric patterns composed of straight lines and 45 degree angles, which is the type of design tablet weaving is naturally inclined to produce.

Magic and religion in the ancient world interest me, because to understand what these concepts meant to the people who believed in them we have to think about how they viewed the world.  Our ancestors weren't stupid or gullible, but they did have a worldview that is in some ways quite alien to us.  We think of the supernatural as something separate from the natural world, but to people in pre-industrial cultures it was just another aspect of the natural world*.

The word "rune" means a secret or mystery, so runes are certainly an appropriate subject for this challenge.  They were often written in code or using ciphers that combine more than one letter.  Sometimes inscriptions that make no sense at first glance are encrypted, or are magical formulae, but not all runic inscriptions were magical.  Many were written for very mundane reasons and sometimes the runes were encrypted just for fun.  This runic code from Bergen is too good not to share!  The men’s beards contain a coded message.  The beards indicate each letter's position in the alphabet, so for example the third beard from left is th, and the next one is á.

Photo: Aslak Liestøl, Museum of Cultural History, University of Oslo


Anyway, we’re getting a bit off track.  My project is, shall we say, speculative.  I'm not aware of any Viking textiles with runes woven into them.   As a technique, tablet weaving lends itself well to incorporating complex designs like lettering, and there are some examples of Anglo-Saxon tablet weaving incorporating writing in the early medieval period.  I'm referring here to the cingulum of Bishop Witgarius and St Cuthbert's maniple.  The inscriptions on these items aren't actually spiritual; they record the names of the women who made and donated the garments.  This use of text to secure bragging rights is common in viking runic inscriptions too, but of course just because Anglo-Saxons did it doesn't mean Scandinavians did it and my runes aren't a signature.

There doesn't seem to be any reason why textiles with runes couldn't exist, but with no hard evidence to go on it definitely falls into the "you can't prove they didn't" category.  That said, runic inscriptions have been found on a wide variety of viking objects, so I say why not?

The Challenge: Sewing Secrets.

Fabric: About 30 cm of brocaded tablet woven band.

Pattern: My own, based on a design from Birka.

Year: If it were at all historically accurate I think it would be early viking age, since the runes are an older style of writing.

Notions: I couldn't afford to use real silk and gold like the Birka bands, so I used synthetic gold thread and mercerized cotton.  To me mercerized cotton looks more like silk than viscose thread, which is unnaturally shiny and has a synthetic look that I don't particularly like.

How historically accurate is it?  Um.  As I've discussed above it's a fun concept, but can't actually be documented for the period.  And the materials aren't accurate either, so maybe 25% at best.

Hours to complete: Not sure sorry.  I've been doing a bit here and a bit there since August and lost count.

First worn:  N/A.

Total cost:  I already had the imitation gold thread, and I seem to remember I paid about $5 for the ball of crochet cotton.


*If you want a good, intellectually-satisfying-but-also-entertaining discussion of why our ancestors believed some of the things they did, I recommend the Tony Robinson series Gods and Monsters.  For an in-depth discussion of magic in the Viking age, try Dr Neil Price's The Viking Way.  Hard to get hold of unfortunately, but worth the effort.  For a really detailed look at rune magic I suggest Stephen Flowers' doctoral dissertation Runes and Magic.

Monday 14 September 2015

My mantua now has a petticoat


This isn't the most exciting or glamorous project,  but I'm really happy to have it done just the same.  The mantua I made back in May looks so much better with a petticoat underneath, and it's a nice petticoat made of fine brown wool in a herringbone weave.   It's an attractive fabric in its own right, but it doesn't overpower the blue mantua.  This photo gives a better indication of what the brown wool looks like:


Yes, that's a pocket slit.  The V&A tells me tie on pockets were already in use in the 17th century when the first mantuas started to appear.

As with the mantua, I used construction techniques that were used in the 17th century.  All the seams are handsewn with linen thread, using a combination of running stitch and whipstitch.


The Challenge: Brown.

Fabric: 1.9 meters of lovely herringbone twill wool.

Pattern: This tutorial from the American Duchess.  Her Grace's pattern is more 18th than 17th century, but I used it anyway because it gives the right shape to go with a mantua. All the pictures of mantuas show petticoats with quite deep knife pleats, so that's what I've done.

Year: Late 17th to early 18th century.

Notions: Linen thread and cotton tape to tie the petticoat.

How historically accurate is it?  I think the pattern is reasonably historically accurate, but since I'm not all that familiar with this time period it's hard for me to estimate how accurate this project is.  Wool was certainly a period fabric and brown is a pretty common colour in all time periods.  Cotton tapes probably aren't accurate; in the 17th and 18th centuries they would have been linen.

Hours to complete: About 8.

First worn:  To check the length.

Total cost:  I've had this wool for a long time, so don't remember what I paid for it.  I would guess somewhere between $15 and $20 per meter.

Thursday 10 September 2015

Economics and the fall of Mycenae

Recently I read a very interesting article about the Great Depression and why it took so long for the US economy to recover, and it made me think about the collapse of Mycenaean civilization at the end of the Bronze Age.  I've often thought there must be an economic dimension to the Late Bronze Age collapse, and reading this article got me wondering how much of that might have been due to the way Mycenaean governments managed their economies.

Map of Mycenaean and other civilizations in the 14th century BCE, via Wikimedia Commons

No one knows exactly what destroyed the Mycenaean city-states, but it appears that drought and famine were contributing factors.  Probably there were a number of factors involved, but for now back to the Great Depression:

When I was in school I was told the Great Depression was largely caused by laissez-faire economics, but the article I linked to provides a different perspective.  The author says the initial stock market crash was the inevitable result of federal monetary policy, but things could have been back to normal in a couple of years.  That had been the case with previous recessions.  Instead the Depression lasted twelve years because of a series of government interventions that were intended to stimulate the economy, but actually did more harm than good.   One example is that the US government introduced high tariffs on foreign goods to make people buy American made and encourage American manufacturing.   But countries that could no longer sell their products in America returned the favour by not buying American goods, and American exporters went bankrupt.  Farmers in particular relied on access to overseas markets and the agricultural sector collapsed.

Mycenaean government policy did not cause the Late Bronze Age collapse; the disaster affected the entire Aegean and Anatolia.  Hittite civilisation was also wiped out, and though Egypt survived she was never the same again.  However, I suggest the extreme centralization of the Mycenaean economy and its dependence on state administration may be one reason why it was hit so hard, and didn't recover once the region started to stabilize again.

How the Mycenaean economy worked

Mycenaean city-states were, to put it mildly, statist.  They revolved around large, centralized bureaucracies that had absolute control over production and trade.  The Mycenaean city-state was primarily an economic entity.  Their wealth was built on trade, and the production of commodities for export defined their way of life.   This is why Mycenaean art and artifacts - and writing - stopped being produced once the city-states collapsed.  These were state controlled industries and without the state to support them the industries collapsed too.

The Mycenaeans had what is known as a redistribution economy.  Income, in the form of produce, livestock, and other resources, was collected by the administrative centers, which used the income to support a huge workforce of textile manufacturers,  metal workers, perfume makers, furniture makers, potters, and other craftspeople.  The numbers of people involved really were very large; the city of Pylos had nearly 400 bronze smiths and 550 textile workers, while Knossos had 900 textile workers.  Olive oil, wine, and probably timber were also exported.

Inlaid dagger from a 16th century BCE tomb at Mycenae.  Mycenaean craftsmanship is truly awe-inspiring. 

Early archaeologists tended to think of Mycenaean trade as being mainly exchanges of prestige items between Mycenaean rulers and the rulers of other states with whom they interacted, but the evidence available now shows very large scale production of commodities that weren't always prestige items, and appear to have been made specifically for export.  Pottery, for instance, was not a luxury item suitable for diplomatic exchanges, but was exported in large quantities.  It may indicate the export of products like wine or oil that were stored in the pottery vessels.

This was not a cash economy and workers were paid in food rations, which wasn't unusual in the ancient world.  Some of the workers were slaves, but not all of them.  Some workers appear to have been farmers who were self-sufficient to some degree.  Citizens were required to provide the government with both produce and labour.  We don't know whether working in state industries was seen as a good opportunity, but it was almost certainly not optional.

To what extent did workers rely on the state?

In some cases it's possible to make an educated guess about how much time people spent working for the state, because they had a quota system.  We know, for instance, that each textile worker listed in the Knossos archives was expected to produce one unit of pa-we-a type cloth, or one unit of te-pa type cloth, and we know how much wool was used to make each unit.  In a paper for the 9th International Aegean Conference, Eva Andersson and Marie-Louise Nosch calculated it would take a specialist worker 175 days to spin the wool required for a unit of pa-we-a type cloth.  If that calculation is accurate it represents a lot of work, and let's not forget the opportunity cost.  The time each woman spent making textiles for export was time she couldn't spend producing clothing and food for her own family, which she would also have had to do.

From an economic perspective the trouble with a quota system is that it isn't responsive to market demands, and creates perverse incentives.  Producers concentrate on filling their quotas, regardless of whether they're making things buyers want.  If you cannot find a market for those goods, this tends to create a problem.  It was certainly a problem for the Soviet economy* and may well have become a problem for the Mycenaeans too.

At the end of the Bronze Age widespread famine and social instability disrupted international commerce, and it is possible the market for Mycenaean manufactured products dried up.  As we've seen, the Knossos tablets suggest that textile workers, and maybe other workers too, were highly reliant on the state and its trading activities for their survival.  You can imagine what would have happened if large numbers of people found themselves out of work, or not getting paid for their work.  They couldn't find other jobs, because there were no other employers.   Keep in mind the fact that most of the Mycenaean palaces were not simply abandoned, they were violently destroyed.

The state as a monopoly

One of the ways a Mycenaean state controlled its means of production was by controlling access to markets and to raw materials.  In many cases the raw materials needed to manufacture Mycenaean commodities were acquired through trade, as payment for manufactured goods or primary products.  Trading was done by the governments, and as far as I know there's no evidence that private citizens worked as merchants.  Of course, it is important to recognise that absence of evidence isn't evidence of absence.  Lack of evidence does not prove there were no economic activities taking place outside the central administration's control, but given the lack of evidence for free enterprise you have to wonder whether governments were actively discouraging it with a view to maintaining their monopolies.  Because the state controlled access to resources, setting up large-scale free enterprise may have been quite difficult anyway.

All this meant that the economy was more than reliant on the government; it was functionally inseparable from the government.  Once the administrative center was destroyed, the infrastructure that Mycenaean industries relied on was no longer there.  By that I mean both physical infrastructure, and people with the skills and knowledge necessary to manufacture commodities and organize large-scale economic activity.  Anything that affected the city-state overall affected everybody and every industry the state was involved with, all at the same time.

Conclusions

The Mycenaean way of life was very different from ours.  Government, economy, industry, and even religion were all rolled into one with very little functional distinction between them.  The system may have originated as a logical way to support large-scale industry by creating economies of scale, and it seems to have worked fairly well when times were good.  The grave goods of elite Mycenaeans show how affluent they were.  However, this extremely centralized production model may have become a problem.  If the central bureaucracy ceased to function for any reason, the state's entire manufacturing  and export industry also ceased to function.  This may be why the Mycenaean city-states didn't recover from the famine and social instability that marked the end of the Bronze Age.

It's also possible that the way Mycenaeans industries were managed left them vulnerable to changes in the wider Aegean and Near Eastern markets.  Mycenaean industries weren't based on demand and profit, they were based on quotas set by the state, and such systems tend not to be very flexible.  Bureaucracies never cope well with change.

Of course, this is all just me speculating, but I think it's both important and interesting to consider ancient civilizations in terms of economic principles.


*However, I would be surprised if Mycenaean industries experienced the same quality control issues for which Soviet products were notorious.  Mycenaean industries seem to have been quite committed to maintaining quality, and since some of the things they were making were luxury goods this was probably necessary.

Sources

Andersson, A and Nosch, M.  2003.  "Investigating Mycenaean Textiles with Help from Scandinavian Experimental Archaeology", published in Metron.

Chadwick, J. 1976. The Mycenaean World. Cambridge: Cambridge University Press.

Chadwick, J. 1958. The Decipherment of Linear B. Second edition 1990. Cambridge: Cambridge University Press.  Some of the information in Chadwick's books is a bit dated now, but they're still good books and well worth reading.

Cline, Eric H., ed. 2012. The Oxford Handbook of the Bronze Age Aegean. Oxford: Oxford University Press.

Kelder, J. M. 2010. "The Kingdom of Mycenae: A Great Kingdom in the Late Bronze Age Aegean".  Bethesda: CDL Press.

Van Wijngaarden, G. J.  2002. Use and Appreciation of Mycenaean Pottery in the Levant, Cyprus and Italy (ca. 1600-1200 BC).  Amsterdam: Amsterdam University Press.

Monday 24 August 2015

Heirlooms and Heritage

August's HSM challenge is Heirlooms and Heritage.   Since I'm mostly interested in very early periods, I've chosen to focus on the heritage side of the coin and celebrate my Danish ancestors by recreating the belt from Borum Eshøj.  There are other similar belts from Egtved and Trindhøj, so it's not unreasonable to think my ancestors in Sjæland might have worn belts like these.

The belt is a warp faced tabby, with the warp ends finished off as decorative tassels.  Structurally it's quite simple, but it uses different coloured wools spun in different ways for decoration.  This kind of decoration is typical of Scandinavian Bronze Age textiles.  They don't seem to have used dyes, but sheep's wool does naturally come in a range of colours and this colour variation was used to create multi-coloured fabric.  Shadow stripes made from a combination of S spun and Z spun yarns were also popular, and some items were embroidered.  In short, textile decoration in Scandinavia at this time focused on texture and subtle colour variations, rather than the bright colours that were popular in the Aegean.

My reproduction belt.

The shadow stripe I tried to make didn't come out as well as I hoped.  It is there, but you have to look hard to see it. I think the primary reason is that the S spun yarn I used was very loosely spun, so once it is woven you can't easily see the direction of the spinning.  The shadow stripe is easier to see in the middle section of yarn, which is the yarn I spun myself and is spun a lot more tightly, but the stripe doesn't come through so well with the loosely spun commercial yarn.

The yellow line shows the direction of the shadow stripe.  You can see it when you know what you're looking for, but it isn't very clear.

I had a problem with finishing off the ends too.  I couldn't quite figure out from photos how the original was done, and had to improvise a bit.  I wouldn't say the result is bad - it works and I like the way it looks, but it's not a good reproduction of the original.  That may not be too much of a problem because all the Bronze Age Scandinavian belts that have survived are a bit different in terms of design and construction.   Still, it annoys me.

On the whole though I'm happy with my belt.  It looks nice, it was fun to make, and it's a fairly good representation of some of the decorative techniques used in Bronze Age Denmark.


The Challenge: Heirlooms and Heritage.

Fabric: The belt contains something like 120 meters of woolen yarn in two slightly different colours.  The original Borum Eshøj belt was made with undyed wool, but a lighter coloured fleece was used for the middle section of the warp.

Pattern: N/A.  It's a simple warp faced tabby so doesn't require a pattern.

Year: Around 1,350 BCE.

Notions: N/A.

How historically accurate is it?  I think maybe 80% as a reproduction of the Borum Eshøj belt.  As a generic Bronze Age Scandinavian belt it may be a little more accurate, since they weren't all exactly the same.

Hours to complete: About 18, including spinning.

First worn:  Not yet.

Total cost:  $23 for two balls of wool.

Monday 10 August 2015

Loom setup for the Borum Eshøj project

You know what's great about warp-weighted looms?  You don't need any equipment at all.  You just need a couple of sticks and something to weight the ends with.

I've now finished setting up the loom for my Bronze Age belt.  As I said previously, I re-spun some of the warp threads to get a combination of S-spun and Z-spun threads.  Now they're all ready to go.  Today,  we're going to look at a quick and easy way to make loom weights, and how you can produce a piece of weaving that is longer than the height of your loom.

Warp weighted loom all ready to go.

The belt from Borum Eshøj is a warp-faced tabby weave, which I find is fairly easy to make on a warp weighted loom.   In general, however,  a warp weighted loom is trickier to work with than something like a table loom.  This project is not too bad because it's a narrow band and uses sturdy yarn, but it does require a certain level of manual dexterity.

As you can see, the warp threads are arranged in groups, and each group is attached to its own weight.  There's a group of homespun threads in the center, and a group of commercially manufactured threads either side.

In Ancient Textiles: Production, Crafts and Society, Marie-Louise Nosch noted that the Borum Eshøj belt's warp threads are divided into groups of 8 like rune staves (the runic alphabet is made up of groups of eight letters, called staves), and she wonders if this was intended to have magical significance.   In Viking Age Scandinavia the number eight did have magical or supernatural connotations.  It occurs in Viking magic inscriptions relatively regularly, and there are also references in the sagas to textiles with magical properties woven into them.  It's likely that number magic was one way of doing this.  This is an interesting idea, but the belt from Borum Eshøj predates the earliest known runic inscriptions by some 1500 years so I don't know how likely it is.  I guess it's possible.  Stephen Flowers*, who is a leading authority on Viking runic magic, believes that the Vikings' magic practices belong to a very old tradition that was in place well before the runic alphabet (and that, esteemed readers, is a little preview of my October project).

Anyway, I did the warp in groups of 8 like the original, because why not?

Let's talk about loom weights.  Loom weights provide tension for the warp threads while you're weaving, and if the warp is made of wool it will stretch slightly.  This is good, it helps keep your weaving nice and tight.  Different yarns need different weights, and there is a bit of trial and error involved in figuring out how much weight you need.  I find commercial yarns intended for knitting are very stretchy and need heavier weights.  The yarns that I spun are spun more tightly and less inclined to stretch, so a lighter weight is fine.  The homespun threads are the ones in the middle, and they only need a 150 gram weight.  A 250 gram coffee mug worked well for the commercial yarn, but I didn't want my coffee mugs bashing together and chipping, so I've used dried lentils weighed out into plastic bags.  Feel free to use other things besides lentils, the sky's the limit here.  Anything that can be conveniently weighed out into small bags will get the job done.

In the ancient world loom weights were made of clay or stone because these were cheap and readily available.   Today,  dried lentils (or rice, or corn kernels) are cheap and readily available, and the benefit of using them is that you can adjust the amount of weight you use very easily and precisely.

Now that we've covered off loom weights, what happens if the piece of cloth you want to make is longer than your loom is tall?  For reasons that should be fairly obvious,  the height of a warp weighted loom is limited by the height of the weaver.  It's still possible to make a longer piece of cloth on the loom, if you roll it up around a bar at the top.  Take a look at this picture of Penelope weaving her tapestry:

Image found here.

You can see that she has a big roll of finished cloth rolled up around the beam at the top of her loom.

This next photo shows how I dealt with the warp ends.  You can see I've tied a knot in the bundle of warp threads, part way down their length.  The weight hangs from this knot.  When I want to weave the rest of the warp, I'll untie the knots, wrap the belt around the header bar to pull it up, and reattach the weight further down the warp threads.  I can repeat this process as many times as I need to, until I reach the end of the warp.


*For everything you ever wanted to know about runes and the magical properties Vikings ascribed to them, read Stephen Flowers' doctoral dissertation Runes and Magic.  

Wednesday 5 August 2015

Linothorax vs modern projectiles

Earlier this year I made a linothorax of the kind used by Alexander the Great's army.  That was a lot of fun, but making armour is only half the story.  The important question is: what sort of protection does it provide?  When Aldrete and co made their linothorakes, they tested them against the kind of arrows that were used in ancient Greece and found that the linothorax was very effective at stopping these arrows.  I don't have access to reproduction ancient Greek arrows, but in my family we like target shooting and we have several modern projectile weapons available.  This weekend dad and I tested the linothorax armour against an airgun, a slug gun, and a crossbow.  We learned that the person in most danger during this process is actually the shooter.

Now, just to recap, my linothorax armour is made the same way it was made in ancient Greece, using layers of linen fabric laminated together with rabbit skin glue.  This test patch is about 10 millimeters thick.  The thickness isn't exactly even across the whole surface, but close enough.  The linothorax functioned a lot like a Kevlar vest, by dispersing the energy of an impact.  Armour like this is good at protecting against blunt force trauma, and it will also give protection against edged weapons.

Here you can see what happened when we shot the armour test patch with an airgun: not much.


These shots were fired from 18 meters (top right corner) and 5 meters.  Interestingly, there was no difference in the degree of penetration.  There wasn't any.  The BBs bounced, leaving only tiny dents in the surface of the armour.  This gun will quite happily embed BBs in plasterboard or weatherboards, but linothorax armour absorbs and deflects the energy of the shots.


The airgun, plus the little dents it made.

Next up is a spring loaded slug gun with a rifled barrel, which belonged to my grandfather.  We tried both flat-head slugs and pointed slugs, and they all bounced.


The impacts from the flat-head slugs are ringed in yellow, and the pointed slug impacts in red.  Other than creating different shaped dents, there was no difference between them.


Next up is a pistol crossbow with a 50 pound draw, which is more like the kind of weapons the armour would actually have been used against.  Like the BBs and the slugs, most of the crossbow bolts bounced off the test patch without penetrating.

This photo shows you exactly how far the crossbow bolts bounced.  Circled in yellow is the crossbow, showing where it was fired from, 3 meters away from the target on this occasion.


A couple of bolts did stick in the test patch.  They went through all the linen layers, but only just.  The tips stuck out the back only a millimeter or so.  If you were wearing the armour you'd get a small scratch at worst and probably not even that, since the Greeks wore clothing under this armour.

For comparison, here's what happened when we fired the crossbow at a plastic shotgun target.

We learned that plastic does not provide effective protection against crossbow bolts.

Linothorax armour, however, does provide effective protection against crossbow bolts.

If you look carefully, you'll see that part of the bolt's steel tip is still visible above the surface of the test patch.  It has only stuck in the material and has not gone through.

We didn't test the armour against a shotgun this time.  For that we'll need to go to the shooting range and put some decent safety precautions in place.  Based on these tests, there is likely to be a significant rebound problem.  Whether the shot will be able to penetrate the test patch is a bit more difficult to predict, but will depend on the load.  It won't stop buckshot, but then very few things do.  Bird shot, however, will be interesting.  I expect the test patch to offer at least some degree of protection against bird shot.


Wednesday 29 July 2015

What my Bronze Age ancestors wore

The next HSM challenge theme is Heirlooms and Heritage.  I've approached this challenge by looking at the types of garments my Bronze Age ancestors wore.  Up to 1875, my father's family* lived in Denmark.  Dad's family came from Møn, where they were farmers as far back as there are Danish census records available.  I can't find any records of my ancestors prior to the 17th century, but Møn has been inhabited since the Palaeolithic.  It has a lot of funerary monuments from the Neolithic through to the Bronze Age and although people were highly mobile at that time, it makes sense to think dad's ancestors were in around that general area.

I have a couple of bronze items on my to-do list, but didn't want to make them for this challenge because I have no way of knowing what socio-economic status my ancestors had.  I settled on reconstructing the Borum Eshøj belt.   Belts are a utilitarian item that everybody uses, regardless of their location or social status, and the belt from Borum Eshøj is a very interesting textile.  It's not a unique item - the Egtved Girl had a similar belt, as did the man from Trindhøj - so while I'll never know for sure if my ancestors wore belts like these it does seem reasonably plausible.

6a00d834515cf669e20115713cd81b970c-800wi (800×693)
Photo found here.

The first question was what wool to use.  New Zealand produces lots of lovely wool, but over the centuries selective breeding has resulted in sheep whose wool is very different to the kind of wool used in Bronze Age Denmark.  Back then, sheep had a double coat consisting of longer, waterproof guard hairs and shorter, fluffier insulating hairs.  The long hairs made stronger yarn, but the shorter hairs made warmer woollier yarn.  So I went looking to see if Bronze Age type sheep were still around, and I found that they are, more or less.  Bronze Age European wool was a lot like Soay wool.  Soay sheep are a primitive breed which retain the characteristics of their Bronze Age ancestors.  However, I couldn't find a source of suitable Soay wool.  Faroese sheep would also be a possibility, but all the Faroese wool I found online was blended with Merino and other things.  If I want a Merino blend I can save myself some money and get a perfectly nice local one, which is what I ended up doing.

I bought fairly chunky yarn in natural fleece colours, so they would look as much like the original as possible.  Borum Eshøj textiles were not dyed and are quite coarse with 3 - 5 threads per cm, but this does not mean they were unsophisticated. The Borum Eshøj belt encorporates both S and Z spun yarn, to create a zig-zag effect in the weave.  The technical term is a shadow stripe, and it was a popular way to decorate textiles in Bronze Age Europe (see NESAT X).  All my wool is commercially made S spun yarn, but the idea of making the belt without that cool shadow stripe really irritated me.

Did you know that if you're careful, you can pick apart commercially produced yarn and re-spin it so that it is Z spun?  I re-spun some of my wool into Z yarn, because apparently I don't know what's good for me.

On the left S spun commercial yarn, on the right my new Z spun yarn.

*I don't know as much about my ancestry on my mother's side.  Given that mum's family is from England, it's a good bet some of her Bronze Age ancestors lived in Denmark too.


Sunday 19 July 2015

A 13,000 year old fashion statement

I finished the Natufian headband, and have had an opportunity to take photos.  Ornaments made from shells were used in the palaeolithic Levant from at least 92,000 years BP and were a characteristic feature of Natufian culture, but we don't know exactly what they signified.  A headband like this one might have carried information about the wearer's social status, or the shells might have functioned as a type of currency.

Fortunately we do know what the headband looked like, so I've been able to reconstruct it.

Since I don't look even remotely Middle Eastern, you will have to use your imagination a bit.


Although this is a reconstruction of a palaeolithic accessory, I think there's something surprisingly modern about it.  It makes me look like a Californian hippy, and I can easily picture a Californian hippy wearing it*.


This is where the two ends of the headband join up.

I think the way I've joined the thread ends looks quite attractive, but I have no idea how historically accurate it is.  I've knotted the warp ends together and pushed them back through the beads to make them tidy, which seems like a logical thing to do, but the original fibers have rotted away so there's no evidence of how it was really done.

The Challenge: Accessorize.

Fabric: 57cm strip of weft twined fabric, with rows of beads strung on the warp threads.

Pattern: N/A.  I did consult diagrams of surviving Natufian textiles, but I don't think that really counts as a pattern.

Year: 14,000 to 13,000 BP (or 12,000 to 11,000 BCE).

Notions: Dentalium shell beads.

How historically accurate is it?  This piece is about as accurate as it's possible to get when reconstructing anything from this time period.  Any reconstruction of an item from so long ago is necessarily conjectural, because no complete items survive and we just don't know how they were made.  As I discussed in my last post, we're lucky even to know what this headband looked like.  However, I have been careful to use materials available to the Natufians, and to make the textile using techniques attested in the archeological record.

Hours to complete: 6 hours.  Warp twined textiles take a long time to make, especially when the process also involves sorting dentalium shells into groups of roughly equal length and threading them onto the warp threads.

First worn:  For photos.

Total cost:  I can't remember how much the dentalium shells cost, but I'd guess it was around $15 to $20.  The thread just came off my big spool of linen.


*Why California?  Because it is extremely cold here right now and I am daydreaming about a holiday in the Napa Valley.

Friday 17 July 2015

Liebster award

bandykullan, who blogs at costumekullan and makes some absolutely phenomenal 18th century and Star Wars costumes, has very kindly nominated me for a Liebster award.  Many thanks, bandykullan!  I'm so glad you've enjoyed my blog.

liebster3
More information on the Liebster award.

Here are the rules for accepting and passing on the Liebster award:
  1. Thank the person who nominated you and link their blog
  2. Display the award on your blog
  3. Answer 11 questions asked by the person who nominated you
  4. Provide 11 random facts about you
  5. Nominate between 5 to 11 blogs for a Liebster
  6. Create a new list of 11 questions for the people you nominated
  7. List the rules in your post
  8. Inform the nominated people that you have nominated them and gave them a link to your blog


So, to answer your questions bandykullan:

1. Which is your favorite fashion decade?
Currently, that would be the 1920s.  So many new styles and new ideas – people were exploring new patterns and techniques, and because people’s lifestyles were changing their expectations of what clothing should be were changing too.  It was a time of experimentation, and even when ‘20s clothes were bad or unflattering they still often had a sense of energy and fun.  I particularly like the Egyptian craze that happened when King Tut’s tomb was discovered.

2. What unexpected skill have you developed because of your costuming hobby?
Hand sewing.  I never, ever used to do it, but since I’m mainly interested in time periods before the invention of the sewing machine it makes sense for me to sew things by hand, and a lot of these things are actually easier to do by hand because that’s how the patterns and techniques were designed.  Now I find I like hand sewing and do a lot of it even on modern clothes.

3. How long does it take you to go to a fabric store?
It really depends on how much time I have available to spend in the fabric store...

4. What do you have in the background while you are sewing?
Sometimes TV or a DVD, sometimes music, and sometimes nothing at all.

5. Which is the most common colour in your costume wardrobe?
Probably blue.  I seem to make a lot of blue things, or at least things that have blue decorative elements.  There are usually plenty of nice blue fabrics available in my local fabric stores, and it was a popular colour in the periods that interest me, and also I just like it.

6. Have you ever thought about taking part in some kind of costume competition?
Not really, no.  I don’t actually know if we have such things in New Zealand.

7. Have you given names to your sewing machine or dressform, or any other tool you are using to make your costumes?
My sewing machine is called Old Faithful.  It’s a '70s Elna I inherited from my mother when she bought a more modern machine, and it’s served me well.  Sure it’s not as fancy as a modern machine, but it’s reliable, built to last, and does everything I need.  Plus, it has a camshaft with lots of cool little cams you can use to do embroidery stitches.

8. How many costumes have you made?
I’ve got a couple of different Bronze Age Aegean outfits, a couple of 1920s outfits, and a Viking outfit, but mostly I concentrate on specific clothing items instead of the whole costume.

9. Do you use wigs or your own hair to create different hairstyles?
It depends on the period.  My real hair is fine for prehistory through the Viking age, but I’d want a wig for 18th century.  For 1920s I’m inclined to go with a turban.

10. What is the longest you have worked on a single project?
50-plus hours researching and trying to figure out how to reproduce a piece of Mycenaean textile.

11. How big is your stash?
It takes up about 12 boxes in my spare room, sorted by fabric type.


Now, 11 random facts about me:
  1. I learned to sew because I hate going clothes shopping.
  2. My degree is in Classical Studies and Philosophy, but I work as a computer programmer/statistical analyst.  You can take the nerd out of the computer room, but you can’t take the computer room out of the nerd.
  3. Over the years I’ve been variously employed as a lackey for a roadworks company, a market researcher, a social policy researcher, and a business intelligence analyst.
  4. My house is heated by a coal fire, and in the past week I’ve burned my entire bodyweight in coal.
  5. When not making historical clothes or food, I enjoy sculpture, reading articles on PLOS ONE, and over-analysing films.
  6. One of my thumbnails is permanently split into two halves, the result of an accident when I was little.
  7. My favourite book is Homunculus, by Hugh Paxton.
  8. I can never resist buying psychedelic or dazzle pattern fabric.
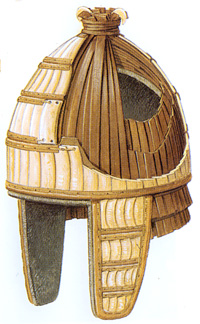
  9. I really, really want to reconstruct a Mycenaean beehive helmet like this one.
  10. My surname is the 9th most common surname in New Zealand.
  11. I’m licensed to drive a tank, though I haven’t actually driven one.

And 11 questions for my nominees:
  1. If you could make any costume from a painting/photo/movie/book, what would it be?
  2. What’s your favourite thing that you’ve made?
  3. Have you ever worn a historical piece as an everyday clothing item, and did anyone notice?
  4. What’s the biggest challenge you’ve overcome in your sewing career?
  5. Do you prefer to use ready-made patterns, or draft your own?
  6. What’s that one thing on your to-do list you want to do but keep putting off?
  7. Do you tend to plan costumes around personas you want to play, or construct personas for costumes you want to make?
  8. What’s that one piece of sewing-related equipment you’d really like to have?
  9. You, of course, are a modern person living in the 21st century.  Do you think that has an effect on how you think about your historical projects?
  10. If you had a time machine, what period would you visit first?
  11. What new project are you most excited about?

The blogs I nominate are:

Loose Threads
Caddams Bertraktelser
Matsukaze Workshops
Marmota's Dress Diaries
Arachne's Blog

If you haven’t read these blogs, you should.  They’re full of amazing projects and fascinating information!